Setelah berhari-hari dengan kesibukan akhirnya aku bisa lagi mengelilingi uncle Google.........
Ok sob,, sebenarnya tools ini dah lama banget ada di dunia maya. Tapi teman blog ada yang meminta,,yah aku coba post deh, n silahkan dunlod bagi yang membutuhkannya (semoga bermanfaat aj).
AntiBlacklist list ini lumayan ampuh, aku dah lama banget gunakan tools ini. kebetulan aku pake KASPERSKY ANTIVIRUS V.8.0.0.506, tools ini berfungsi untuk crack KAS n KIS dibawah tahun 2010.
Cara menggunakannya juga sangat mudah banget sob, g ribet.............
Caranya :
1. Setelah sobat selesai meng Install KAS ataupun KIS, Restart PCsobat
2. Kemudian langsung pergi ke settingan antivirus.
kalau bingung bisa klik kanan lambang kaspersky pada "tray", kemudian pilih setting
2. Setelah masuk ke settingan sobat "disable" Self Defense
Setting KIS 2010
3. Exit Antivirus KAS atau KIS.
4. Kemudian install Crack KasperskyAntiblaclist yang ada didalam file rar.
5. Tunggu sampai KAS atau KIS nya muncul.
6. Kemudian Pilih "Activate using the appropriate key " ( pilih key KAS atau KIS) yang ada di file rar.
7. Ok Have Fun dah !!!! Mudahkan ??? ( semoga bermanfaat)
ne Crack KasperskyAntiblacklistnya silahkan DOWNLOAD n Passwordnya Disini
Segelas Jus jeruk tak hanya menawarkan kesegaran dan menghapus dahaga. Minuman yang kaya akan vitamin C ini juga mampu menghambat batu ginjal disaluran kemih. Batu ginjal dapat terbentuk antara lain bila air kemih jenuh dengan garam. Cara kerjanya dengan menurunkan pembentukan kristal asam urat dan kalsium oksalat, penyebab utama terbentuknya batu ginjal. Selain itu jus jeruk pun meningkatkan kadar sitrat didalam urine sehingga pembentukan batu berkurang. Begitulah riset terbaru yang dilakukan dr. Clarita Odvina dari fakultas kedokteran University Texas Southwestern, Dalas, Amerika Serikat.
Omelet,Capcay, dan Burger lazim memanfaatkan bawang bombay sebagai bumbu. Faedah A;;ium cepa bukan cuma sebagai penyedap masakan. Anggota family Liliaceae itu juga berkhasiat mencegah osteoporosis alias keropos tulang. Para periset University of Bern, Swiss menemukan growth plate chondrocytes (GPCS) dalam umbi lapis tanaman yang diduga berasal dari Palestina. GPCS itulah yang ampuh mencegah osteoporosis. Cara kerja senyawa dari golongan peptida itu dengan menghambat berkurangnya massa tulang termasuk kalsium. Oleh karena itu rutinlah menkonsumsi sebuah bawang bombay per hari. Ahli kuliner mengiris tipis bawang bombay membentuk lingkaran, membumbui, dan menggoreng dalam tepung. Menyantap panganan itu cara bijak menabung tulang.
Though I'm generally known as an actions guy, I'm interested in all types of addons you can create in Photoshop. 5.0 gave us a lot of options, but Photoshop 6 has surpassed the older versions by leaps and bounds in presets that can be created, saved and reused in Photoshop, as well as be distributed to others. I've dealt with some of these features in my articles on Planet Photoshop (http://www.planetphotoshop.com) as well as my site (http://actionfx.com), but I still think there is plenty to cover in these areas, especially where it comes to Layer Styles.
Maybe you are unfamiliar with Layer Styles as yet, and so I'll cover them briefly. Layer Styles are simply groups of commands saved as a preset, that may be instantly applied to type or a filled selection in Photoshop. Going to Window>Show Styles will bring up the Styles Palette, which may look something like this:
When you initially open the palette, there will be a few styles loaded. These are not all that came with the program. If you want to check out more styles click the small arrow to the upper right of the palette and go to load or replace styles. The rest of the presets available are in Photoshop 6>Presets>Styles.
Let's run through a couple examples. To begin with I'm creating a new image with a white background. I'll enter some large type so you can see what is going on… any color will suffice. For those of you interested, this font was found online. The name is Viper Squadron… very cool I think!
With the type layer active, let's pick a couple Layer Styles and see what happens. With one click, we get this:
… or this:
or even this:
Pretty cool stuff, huh? The obvious benefit to developing and using layer styles is to create a site with similar effects in the buttons, titles, portions of an interface, etc. The graphics mesh, thus giving the viewer of your site the impression that you know what you are doing when it comes to design… and you did it all with a couple mouse clicks! These can also be fantastic in generating rollovers, and Adobe has even labeled a couple of their style sets thusly.
Let's go back to that last style we used. Let's say it is close to the effect you are looking for, but not quite… is there a way to alter the Style to suit your needs? Sure there is… we can even save the style in it's altered state without losing the original style. Once you have applied the style, go to the layers palette. Beneath the active type layer there are a few commands attached to the layer, under the heading 'Effects'. Clicking this will bring up the layer style options, where we may change any of the presets to taste. For example, say I'd like more of a metallic effect. I know from past experience that I want to adjust the curve applied to the bevel, and by selecting the bevel/emboss option I can apply either a saved preset curve to the bevel or, by clicking directly in the small curve window, create my own to apply to the text. Here are my settings:
Here is the result:
Not too bad, but I'm not too fond of red. I started with blue type, and I can still have a semblance of blue with this style by deselecting the Color Overlay option. I can them apply a gradient overlay instead for another variation.
Again, the result:
That I like! I used to have to record all these steps in an action to recreate the effect later, but as I've stayed within the realm of the Layer Styles and only effected one layer, I can instead save this as my own style for later application. When I'm satisfied with the effect, in the Layer Style Options window I can click 'New Style' and the preset will now be loaded into my Styles Palette for later use. Once I have a bunch created, I can then save the group and, as I've done on Action Fx and here, distribute them to whoever has an interest.
I hope this little article has been informative as well as helpful. Until next time, Chow!
This tutorial will teach you how to digitally "dye" your hair, with the amazing Photoshop. This way is harmless and doesn't involve the use of chemicals of any sort.
OK, here is my starting image.
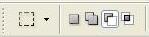
So open your picture up, now let's select our main tool for this tutorial, the "Lasso Tool [L]".
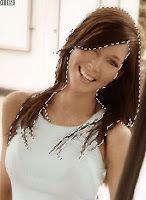
To color our image, we'll need to select only the hair part of the image. If you select any other part, that part will also be colored, which we don't want.
So move slowly and steadily along the hair line. Use Shift to select additional areas. This step may take a few minutes, but it's the most important part.
If you accidentally selected an area that you want to remove from the lasso selection.
OK, now you should have the perfect selection of the image's hair, like so:
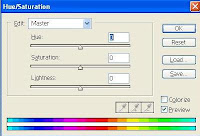
Now that we have that, we need to actually color it. Go to Image >>> Adjustments >>> Hue/Saturation.
That will open a small window where you can define the color preferences of the new hair color. The easiest way to get your desired hair color is to play around with the bars until you get something you like.
On the bottom right, there's an option to select "Colorize", for this task,
I would recommend that you don't use it, as if you select it, it will give you
very un-natural colors to use, and we would probably like to color the hair with a
"natural" color.
Play Imagination, Begin creating!!!Good Luck For You!!!